Chatbots have become increasingly popular in recent years as a way for businesses to interact with their customers. One of the most powerful chatbot tools available is ChatGPT, a large language model developed by OpenAI. In this blog post, we will show you how to build a ChatGPT chatbot using the ConnectyCube API and Node.js SDK.
The ConnectyCube Node.js SDK is a powerful set of tools for building real-time chat and messaging applications. It provides a simple, easy-to-use API for integrating with the ConnectyCube platform, which allows you to easily add real-time chat functionality to your application.
ChatGPT and Node.js
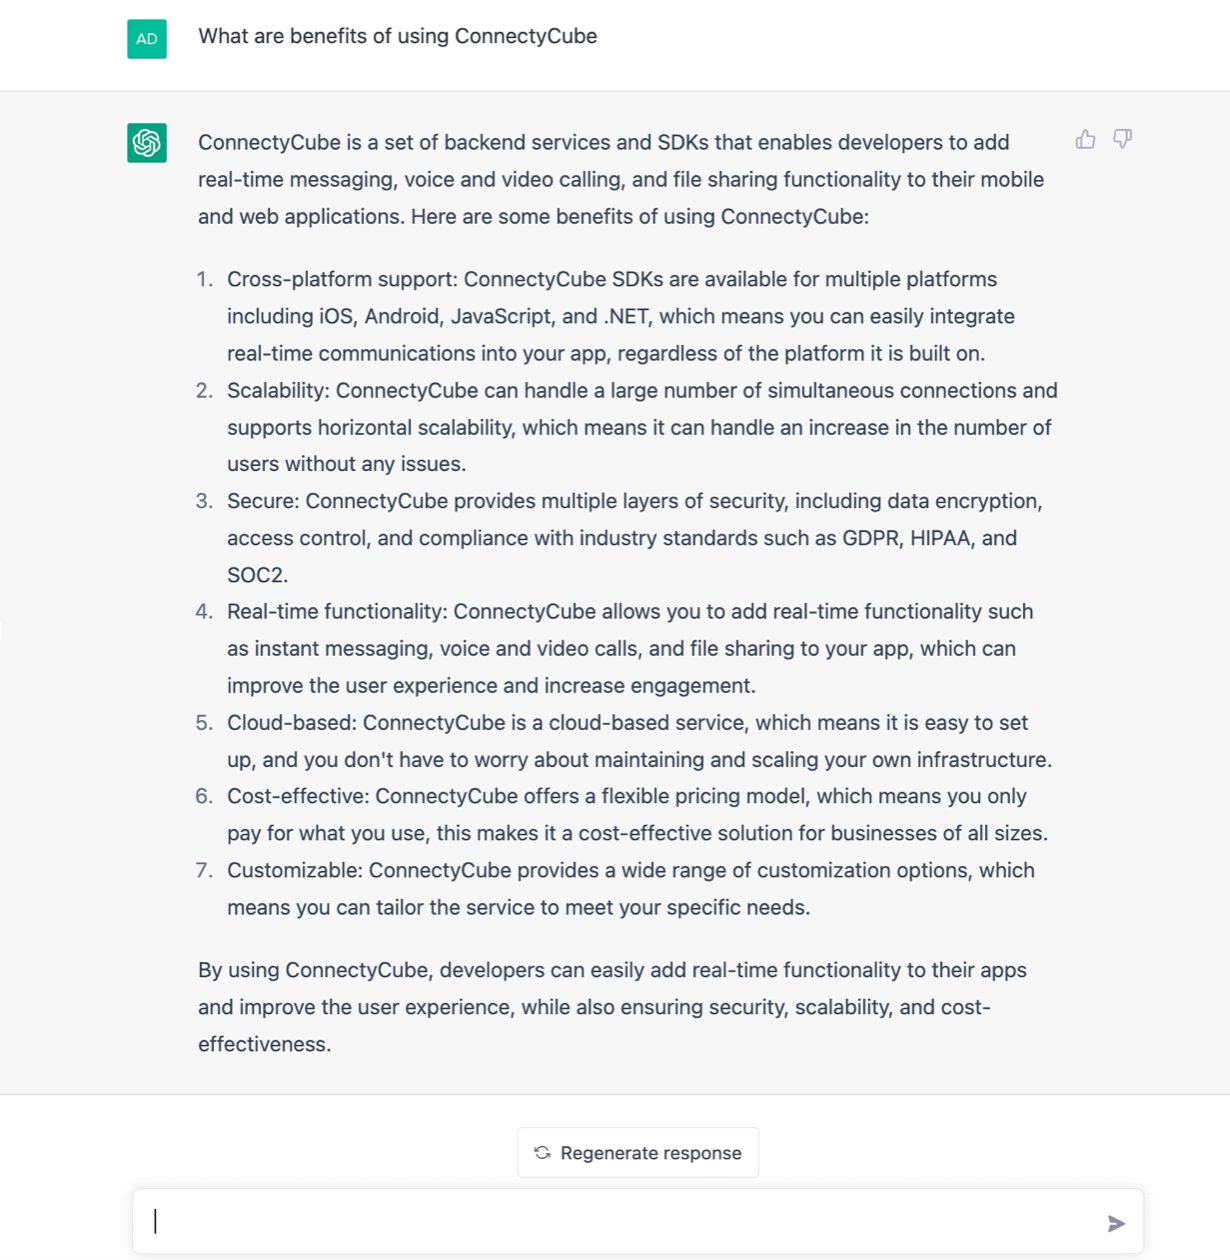
GPT-3 (short for “Generative Pre-training Transformer 3”) is a natural language processing (NLP) model trained on human-generated text. Given some text input, it can generate its own human-like text based in a variety of languages and styles. Here, I ask it to “What are benefits of using ConnectyCube”:
You can test out ChatGPT in the browser here.
The GPT-3 model uses a transformer architecture. This multi-layer neural network is good for processing sequential data, like text. Language-related tasks it can perform include translation, summarization, and question answering, as well as text generation comparable to human text generation.
To mimic ChatGPT in a Node.js application, you must use the OpenAI API.
Build your own ChatGPR ChatBot
Register a ConnectyCube Account and create Application
To get started building your chatbot, you will first need to set up a free account with ConnectyCube and create a new application. Once your application is set up, you can use the SDK to connect to the ConnectyCube platform and start sending and receiving messages.
Go to ConnectyCube Dashboard and register your free ConnectyCube account.
Upon sign in you will see the main page where you need to find the New app button and click on it to create an Application.
At the end you will see the auto-generated values of the Application ID, Authorization key and Authorization secret. These are important – your app needs to use these credentials so that server knows who’s there.
Create Bot user
At ConnectyCube Dashboard, in Users module – create a new user to control your chat bot. Then save somewhere the user’s ID, login and password. We will need these values later.
Create Node.js application to control your bot
The next step in building your chatbot is to create a new Node.js project and install the ConnectyCube SDK. You can do this by running the following commands in your terminal:
mkdir my-chat-bot
cd my-chat-bot
npm init
This will ask you a bunch of questions, and then write a package.json file for you. More information on npm init.
The main thing is that we have now a package.json file and can start develop our first chat bot.
Connect ConnectyCube SDK
In terminal type the following command:
npm install connectycube --save
Create index.js file
In terminal type the following command:
touch index.js
It will create the main entry point for your bot.
Then also open package.json file and add command to run our bot:
"scripts": { "start": "node index.js" },
Now open the index.js file and let’s write some logic.
Making heart beat of your bot
Open index.js file and write the following code:
const Connectycube = require("connectycube");

// Initialise SDK

const APPLICATION_CREDENTIALS = {
  appId: 0,
  authKey: "...",
  authSecret: "...",
};

ConnectyCube.init(APPLICATION_CREDENTIALS);

// Connect to Real-Time Chat

const BOT_USER_CREDENTIALS = {
  userId: 0,
  password: "...",
};

const onError = (error) => {
  console.log("Chat connect is failed", JSON.stringify(error));
  process.exit(1);
};

const onConnected = () => {
  console.log("Bot is up and running");
  // Add chat messages listener
  Connectycube.chat.onMessageListener = onMessageListener;
};

function onMessageListener(userId, msg) {
  // process 1-1 messages
  if (msg.type === "chat" && msg.body) {
    const answerMessage = {
      type: "chat",
      body: msg.body, // echo back original message
      extension: {
        save_to_history: 1,
      },
    };

    Connectycube.chat.send(userId, answerMessage);
  }
}

Connectycube.chat.connect(BOT_USER_CREDENTIALS).then(onConnected).catch(onError);

process.on("exit", function () {
  console.log("Kill bot");
  Connectycube.chat.disconnect();
});
This is a simple bot that simply reply back with origin message. Nothing especial. But you got the idea.
You just need to put in APPLICATION_CREDENTIALS variable your Application credentials and in BOT_USER_CREDENTIALS variable – you bot user credentials.
Improve bot’s intelligence by connecting OpenAI API
Usually, it’s not enough just to build simple bot which echoes your messages. It’s better to add some intelligence for you bot.
Here is where ChatGPT OpenAI API comes to the rescue:
After making an OpenAI account, you’ll need an API Key. You can get an OpenAI API Key here by clicking on + Create new secret key.
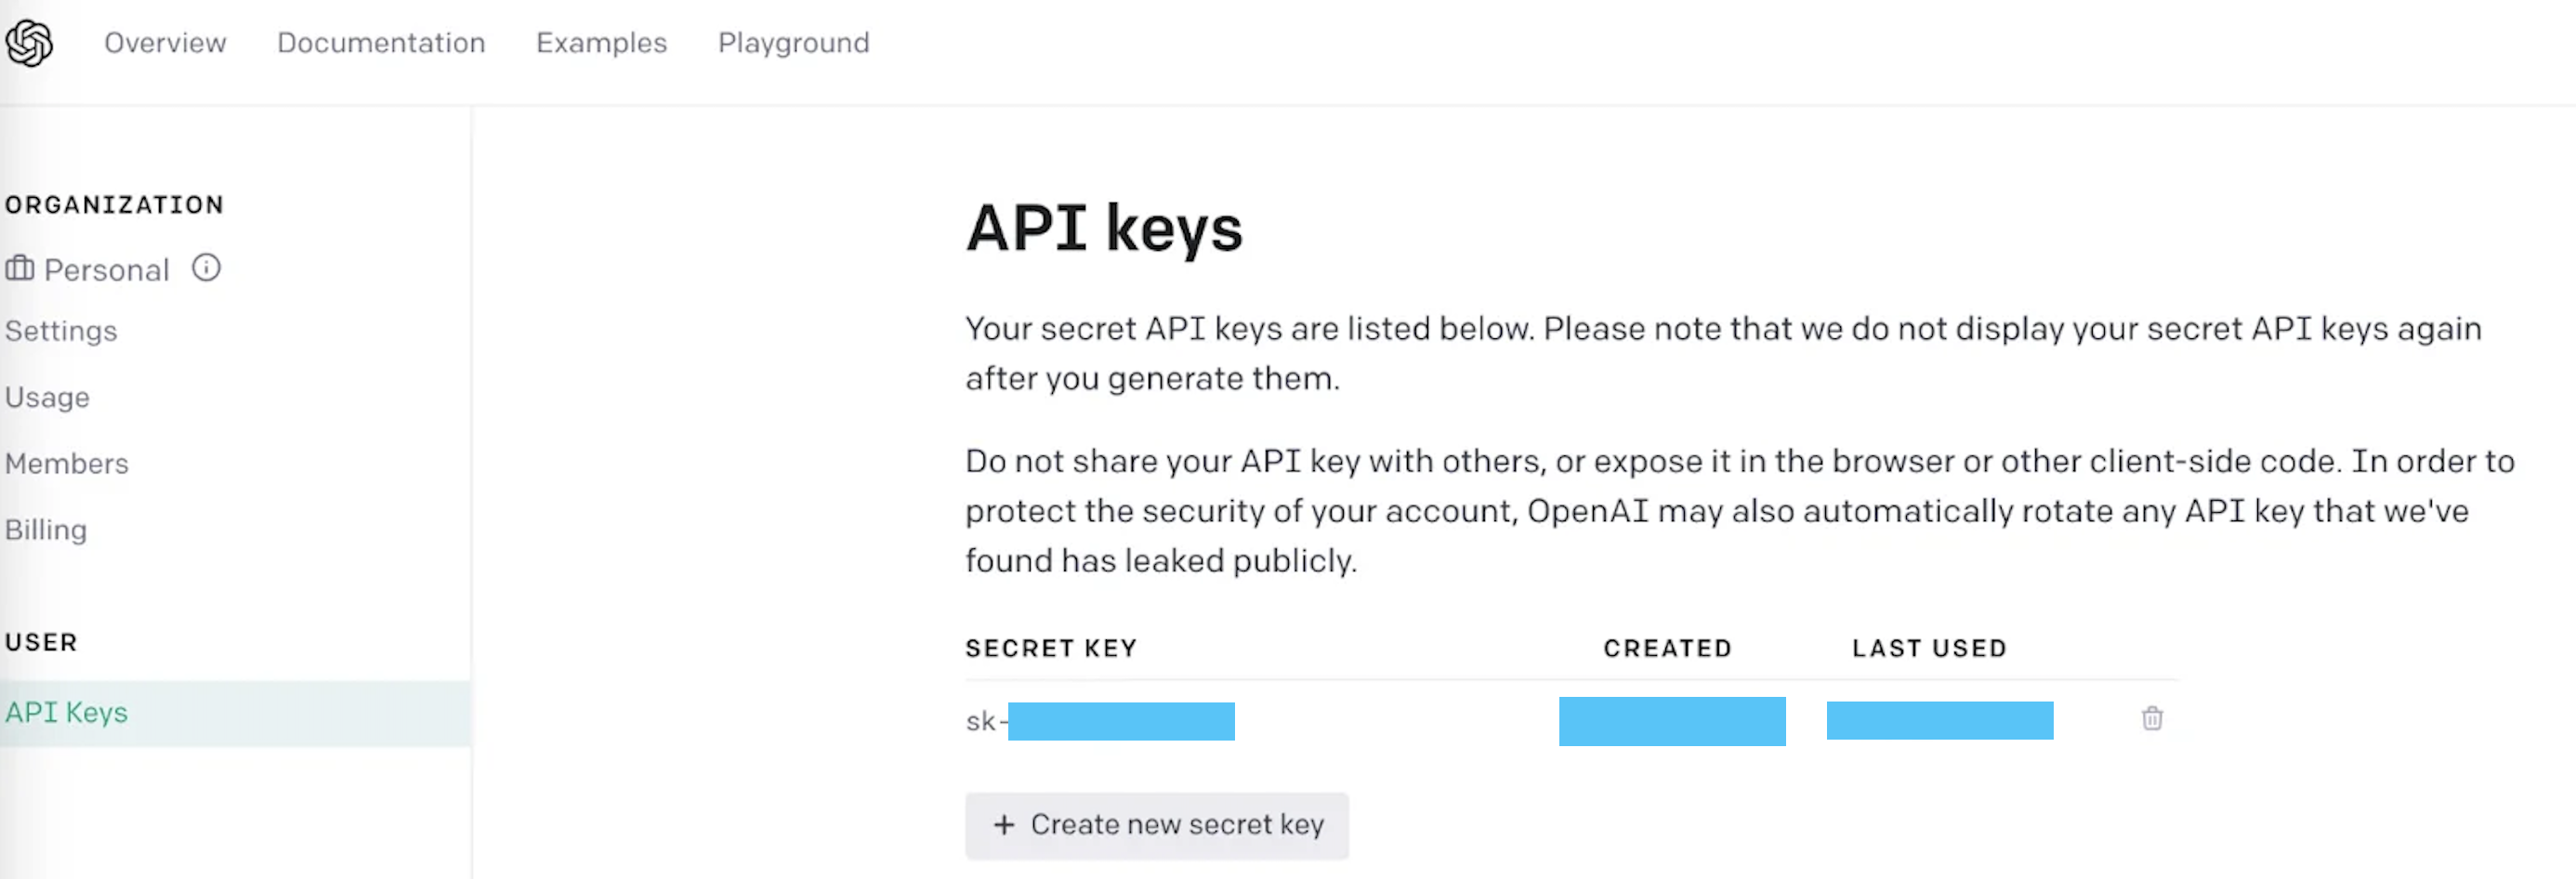
Save that API key for later to use the OpenAI client library in your ConnectyCube Chat Bot.
Connect OpenAI API SDK
Open index.js file and write the following code:
const { Configuration, OpenAIApi } = require("openai");
const configuration = new Configuration({ apiKey: <YOUR_OPENAI_API_KEY> });

const openai = new OpenAIApi(configuration);
const response = await openai.createCompletion({
     model: "text-davinci-003",
     prompt: msg.body,
     temperature: 0.7, //A number between 0 and 1 that determines how many creative risks the engine takes when generating text.
     max_tokens: 3000, // Maximum completion length. max: 4000-prompt frequency_penalty: 0.7 // # between 0 and 1. The higher this value, the bigger the effort the model will make in not repeating itself.
});
And then modify the answer message object:
 const answerMessage = {
    type: "chat",
    body: response.data.choices[0].text,
      extension: {
      save_to_history: 1,
    },
 };
This code imports openAI, initializes a Configuration object and passes it an object to the Configuration constructor containing the property apiKey. The function then calls the openai.createCompletion function to use one of their language models to generate text based on msg.body.
In order to specify our completion, you need to pass in a configuration object containing two properties: model and prompt. model identifies the OpenAI language model used to generate an answer for the text which we assign to the prompt property. In this tutorial, you’ll use the text-davinci-003 language model. It’s the same language model used in the background by ChatGPT. The OpenAI docs list the other language models they offer for use.
Optional properties max_tokens and frequency_penalty specify the maximum completion length and the effort the model will make to not repeat itself. You can see more optional properties for completion here in the OpenAI documentation.
Run our bot
In terminal type the following command:
npm start
Now you can write something to your bot and will receive a reply using ChatGPT!
Host your bot
You can host your chat bot on any virtual server. If you do not have any in your mind – we will recommend the following:
Above are very simple in setup.
What’s Next
Once you have a ready chat bot, you can connect it with your Chat app by using same ConnectyCube app credentials, so then your user base can interact with the bot.If you do not have a ready app yet, here is a list of open source and ready Chat app code samples for various platforms:
Hurry up to add a new feature to your apps to make it more user friendly and competitive in the market! There are much more use cases with Chat bots and ChatGPT.
Let us know what you’re working on with OpenAI – we are eager to see what you build.
If you have any questions, please do not hesitate to contact us.
[mc4wp_form id=1896]