As Twilio is no longer onboarding new customers to Programmable Video, this article is about migrating Twilio applications to ConnectyCube – real-time communication platform offering messaging, video and voice calling and ensures high quality for their communication solutions.
In this guide, we’ll walk you through migrating your video calling application from Twilio Video to ConnectyCube Video Conferencing. ConnectyCube offers a comprehensive set of features such as video conferencing, streaming, shared whiteboard, recording, meeting scheduling, room chat and notifications. Additionally, ConnectyCube provides free P2P audio and video calls.
Go to JS Video Conferencing SDK documentation for your reference before starting the migration
1. Pre-requisites
Before starting, ensure you have created a ConnectyCube account and application on the admin panel. If you still require to create the one, follow these steps:
- Register a new ConnectyCube account:
Go to https://connectycube.com/signup/ and register a ConnectyCube account.You will receive a confirmation e-mail shortly. Confirm your registration by following the link in the e-mail. - Sign in to the Dashboard:
- Go to https://admin.connectycube.com/signin, enter your Login and Password and click on the Log in button.
- Create first application:
- Upon sign in you will see the main page where you need to find the New app button and click on it.
- Next step is to fill the Add new application form. Here you need to enter the information such as the title of your app, its website, type and description.
- Click on the button Add in the bottom. The app will appear in the list of your apps.
You will see the auto-generated values of the Application ID, Authorization key and Authorization secret. These are important – your app needs to use these credentials so that server knows who’s there.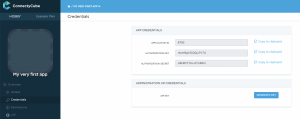
2. Download and install ConnectyCube SDK
Install the ConnectyCube SDK. You can do this via npm/yarn:
# using npm
npm i connectycube
# using yarn
yarn add connectycube
Remove Twilio via npm/yarn:
# using npm
npm uninstall twilio-video
# using yarn
yarn remove twilio-video
3. Initializing ConnectyCube
The starting point of integration with the platform is to initialize ConnectyCube in your project.
Replace your Twilio initialization code with the following:
const credentials = {
  appId: ...,
  authKey: "...",
  authSecret: "..."
}
const config = {
  debug: { mode: 1 },
}

ConnectyCube.init(credentials, config)
4. User Authentication
ConnectyCube uses the authentication flow similar to Twilio. Here’s how the use can create a user and login:
await ConnectyCube.createSession()
const userProfile = {
  login: "superuser001",
  password: "supersecurepwd",
  email: "super_user_001@gmail.com",
  full_name: "Super User",
}
const user = await ConnectyCube.users.signup(userProfile)
const userCreds = {
  login: user.login,
  password: userProfile.password,
}
await ConnectyCube.login(userCreds)
5. Connect to the chat for conference signaling
ConnectyCube uses chat connection to listen for conference events, dispatch signals to room participants, and use conference chat. The code below demonstrates how to connect to the chat for conference signaling:
const params = {
  userId: user.id,
  password: userProfile.password,
}

await ConnectyCube.chat.connect(params)
6. Get and render user Local Media
Below is a comparison of getting and displaying local media in Twilio and ConnectyСube:
In Twilio Video we need to prepare a container in the HTML document:
<div class="video-container-div" width="1920" height="1080"></div>
Capture local video and display it:
// video
let localVideoTrack = await twilioVideo.createLocalVideoTrack({
  height: { ideal: 720, min: 480, max: 1080 },
  width:  { ideal: 1280, min: 640, max: 1920 },
  aspectRatio: 16/9,
})

twilioRoom.localParticipant.publishTrack(localVideoTrack)
const localMediaContainer = document.getElementById('video-container-div')
localMediaContainer!.appendChild(localVideoTrack.attach())
Get local audio and add it:
// audio
let localAudioTrack = await twilioVideo.createLocalAudioTrack()

twilioRoom.localParticipant.publishTrack(localAudioTrack);
const audioElement = localAudioTrack.attach();
document.body.appendChild(audioElement);
For ConnectyCube conference prepare <video> and add it to the HTML document:
<video playsinline id=”myVideoElementId” />
Capture local media from a device’s camera/microphone:
const mediaParams = {
  audio: true,
  video: true,
};

const confLocalStream = await confSession.getUserMedia(mediaParams)
Display the local stream:
confSession.attachMediaStream("myVideoElementId", confLocalStream, {
  muted: true,
  mirror: true,
})
7. Create a Video Conference, manage and join a room
Twilio Video provides these methods to create, join and manage video rooms, and enable room recordings:
Join a Video Room in Twilio:
const { connect } = require('twilio-video');

connect('$TOKEN', { name:'my-new-room' }).then(room => {
  console.log(`Successfully joined a Room: ${room}`);
  room.on('participantConnected', participant => {
    console.log(`A remote Participant connected: ${participant}`);
  });
}, error => {
  console.error(`Unable to connect to Room: ${error.message}`);
});
Create a room in Twilio in this way:
curl -XPOST 'https://video.twilio.com/v1/Rooms' \
     -u '{API Key SID}:{API Secret}' \
     -d 'UniqueName=DailyStandup'
Enabling Room Recordings:
curl -XPOST 'https://video.twilio.com/v1/Rooms' \
      -u 'SKXXXXXXXXXXXXXXXXXXXXXXXXXXXXXXXX:your_api_key_secret' \
      -d 'UniqueName=DailyStandup' \
      -d 'Type=group' \
      -d 'RecordParticipantsOnConnect=true' \
      -d 'StatusCallback=http://example.org'
ConnectyCube offers a comprehensive video conferencing solution that integrates seamlessly with your applications. You can create, manage, and join video meetings with ease. Additionally, you have the option to enable recording, and chat functionalities, set up start/end dates for planning, and point room attendees within your video meetings.
Creating a meeting object with the necessary parameters for ConnectyCube Video Conference will look like this:
const params = { name: "My meeting", start_date: timestamp, end_date: timestamp attendees: [ {id: 123, email: "..."}, {id: 124, email: "..."} ], // either ConnectyCube users ids or external emails can be provided record: false, // true if you want to have a meeting call recorded chat: false, // true if you want to have a chat connected to meeting } const meeting = await ConnectyCube.meeting.create(params) const confRoomId = meeting._id
Сreate a conference session and join to the meeting:
const confSession = await ConnectyCube.videochatconference.createNewSession()

await confSession.join(confRoomId, userId, userDisplayName)
8. Handle participant connections
When a new user joins the room, need to handle this event, get remote media, and display it in the application interface.
Twilio participant connected:
room.on('participantConnected', participant => {
console.log(`Participant "${participant.identity}" connected`);

  participant.tracks.forEach(publication => {
    if (publication.isSubscribed) {
      const track = publication.track;
      document.getElementById('remote-media-div').appendChild(track.attach());
    }
  });

  participant.on('trackSubscribed', track => {
    document.getElementById('remote-media-div').appendChild(track.attach());
  });
});
ConnectyCube participant connected:
ConnectyCube.videochatconference.onParticipantJoinedListener = (
  session,
  userId,
  userDisplayName,
  isExistingParticipant
) => {
  console.log(`Participant "${userDisplayNamey}" joined to the Room`);
}

ConnectyCube.videochatconference.onRemoteStreamListener = (session, userId, stream) => {
  confSession.attachMediaStream(`remoteMedia-${userId}`, stream, {
    muted: false,
    mirror: false,
  })
}
Managing participant disconnections:
Twilio participant disconnected:
room.once('participantDisconnected', participant => {
  console.log(`Participant "${participant.identity}" has disconnected from the Room`);
});
ConnectyCube participant disconnected:
ConnectyCube.videochatconference.onParticipantLeftListener = (session, userId) => {
   console.log(`Participant "${userId}" has left the Room`);
}
9. Mute/Unmute camera and microphone due to conference call
During a conference session, the user can mute his/her own microphone or local video, as well as resume it. This is a code comparison of how to do it:
Mute and unmute local audio and video in Twilio:
// audio
room.localParticipant.audioTracks.forEach(publication => {
  publication.track.disable(); // mute
  publication.track.enable(); // unmute
});

// video
room.localParticipant.videoTracks.forEach(publication => {
  publication.track.disable(); // mute
  publication.track.enable(); // unmute
});
Mute and unmute local audio and video in ConnectyCube:
// audio
confSession.muteAudio(); // mute
confSession.unmuteAudio(); // unmute
confSession.isAudioMuted(); // check mute state (true/false)
// video
confSession.muteVideo(); // mute
confSession.unmuteVideo(); // unmute
confSession.isVideoMuted(); // check mute state (true/false)
10. Leave and End Sessions
To leave current joined video room:
Twilio:
twilioRoom.disconnect()
ConnectyCube:
await confSession.leave();
Gain more with ConnectyCube
ConnectyCube offers a variety of features that significantly enhance the functionality of your application. Here are some of the key features we offer:
- Whiteboard – For collaborative drawing sessions, the whiteboard feature is ideal. It allows multiple users to draw and annotate in real-time during a video call or a separate session. Learn more about the whiteboard.
- Recording – Record your video conferences and calls to review them later or for record-keeping purposes. This feature is especially useful for business meetings and educational sessions. Learn more about recording.
- Scheduling Meetings – Plan and schedule meetings with ease. ConnectyCube provides tools to schedule video calls and send invitations to participants. Learn more about scheduling meetings.
- Notifications (Push) – Configure push notifications to keep users informed about new messages, calls, or any other events. This helps in keeping the users engaged and updated. Learn more about push notifications.
- Screen Sharing – Share your screen during a video call to enhance collaboration and presentations. This feature is particularly useful for online meetings, tutorials, and technical support. Learn more about screen sharing.
- Chat in Conference – Integrate chat functionality within your video conferences to enable real-time text communication alongside video. This feature enhances interaction and provides a comprehensive communication solution. Learn more about chat in conference.
- Switch Audio/Video Input During Conference – Easily switch between different audio and video input devices during a conference. This feature provides flexibility and ensures that you can adapt to different environments and technical requirements. Learn more about switching audio/video input.
- Platform Availability – ConnectyCube’s SDK is available on multiple platforms including:
- Flutter
- React Native
- Web
- Native Script
- Cordova
- iOS
- Android
Migrating from Twilio Video to ConnectyCube Video Conferencing offers a robust alternative that can address specific needs like cost-efficiency, customization, and scalability. ConnectyCube provides a versatile platform with extensive API support, facilitating a smooth transition while enhancing the user experience with its comprehensive features.
Check out more with our powerful JS Video Conferencing SDK documentation to ensure a smooth and easy migration.