![]()
With Twilio Video announcing the end of new customer onboarding, it’s crucial to transition your Flutter projects to another robust communication platform. This migration ensures your application remains supported and future-proofed against service discontinuations. Choosing the right platform, such as ConnectyCube, not only guarantees uninterrupted service but also offers enhanced features for a more robust user experience. Take proactive steps now to migrate your projects seamlessly and maintain the high standards of communication your users expect.
This guide will help you migrate your Flutter video calling application from Twilio Video to ConnectyCube Video Conferencing. ConnectyCube offers a wide range of features, including video conferencing, streaming, shared whiteboard, recording, meeting scheduling, room chat, and notifications. Additionally, ConnectyCube provides free peer-to-peer audio and video calls.
ConnectyCube Video Calling P2P API and Multiparty Video Conferencing API is built on top of WebRTC protocol and based on top of WebRTC Mesh architecture.
1. Pre-requisites
First, make sure you have created a ConnectyCube account and set up an application in the admin panel. If you still need to do this, follow these steps:
- Register a new ConnectyCube account:
Go to https://connectycube.com/signup/ and register a ConnectyCube account.
You will receive a confirmation e-mail shortly. Confirm your registration by following the link in the e-mail. - Sign in to the Dashboard:
Go to https://admin.connectycube.com/signin, enter your Login and Password and click on the Log in button. - Create 1st application
- Upon sign in you will see the main page where you need to find the New app button and click on it.
- Next step is to fill the Add new application form. Here you need to enter the information such as the title of your app, its website, type and description.
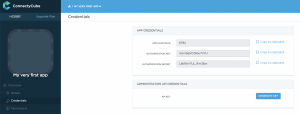
- Click on the Add button in the bottom. The app will appear in the list of your apps.You will see the auto-generated values of the Application ID, Authorization key and Authorization secret. These are important – your app needs to use these credentials so that server knows who’s there.
2. Download and install ConnectyCube SDK
Install the ConnectyCube SDK. You can do this using Flutter tools:
flutter pub add connectycube_sdk
Remove Twilio using Flutter tools:
flutter pub remove twilio_programmable_video
3. Initializing ConnectyCube
The starting point of integration with the platform is to initialize ConnectyCube in your project.
Replace your Twilio initialization code with the following:
const String apiEndpoint = 'https://api.connectycube.com';
const String chatEndpoint = 'chat.connectycube.com';
const String confServerEndpoint = 'wss://janus.connectycube.com:8989';

setEndpoints(apiEndpoint, chatEndpoint);
ConferenceConfig.instance.url = confServerEndpoint;
4. User Authentication
ConnectyCube uses an authentication flow similar to Twilio. Here’s how the use can create a user and login:
var userToCreate = CubeUser(
  login: "superuser001",
  password: "supersecurepwd",
  email: "super_user_001@gmail.com",
  fullName: "Super User",
);

var createdUser = await signUp(userToCreate);
var loggedUser = await signIn(createdUser..password = 'supersecurepwd');
For more details, please refer to the ConnectyCube Authentication and Users documentation for Flutter platform
5. Connect to the chat for conference signaling
ConnectyCube uses a chat connection to listen to conference events, dispatch signals to room participants, and use conference chat. The code below demonstrates how to connect to the chat for conference signaling:
var chatUser = CubeUser(id: session.userId, password: 'user_password');

var loggedChatUser = await CubeChatConnection.instance.login(chatUser);
6. Get and render user Local Media
Get and attach local media in ConnectyCube
The ConnectyCube Flutter SDK doesn’t require any action from a user to get local media sources. The SDK will use the microphone only for audio calls and both microphone and camera for video calls. You just need to listen to the callback with the local media stream creation and display it on the UI:
confSession.onLocalStreamReceived = _addLocalMediaStream;

Future _addLocalMediaStream(MediaStream stream) async {
    var renderer = RTCVideoRenderer();
    await renderer.initialize();

    renderer.srcObject = stream;

    var widget = RTCVideoView(
        renderer,
        objectFit: RTCVideoViewObjectFit.RTCVideoViewObjectFitContain,
        mirror: true,
    ); // the 'widget' can be used anywhere you need in the widgets tree
}
Get and attach local media in Twilio
First, you need to prepare the LocalAudioTrack and LocalVideoTrack:
var localAudioTrack = LocalAudioTrack(true); // create an audio track

var cameraSources = await CameraSource.getSources(); // retrieve the camera source of your choosing

var cameraCapturer = CameraCapturer(
    cameraSources.firstWhere((source) => source.isFrontFacing),
);

var localVideoTrack = LocalVideoTrack(true, cameraCapturer); // create a video track

var widget = localVideoTrack.widget(); // the 'widget' can be used anywhere you need in the widgets tree
Then you need to set them to the room connection options:
 var connectOptions = ConnectOptions(
    …
    audioTracks: [localAudioTrack], // optional list of audio tracks
    videoTracks([localVideoTrack]), // optional list of video tracks
    …
 );
7. Create a Video Conference, manage and join a room
Twilio Video provides these methods to create, join and manage video rooms, and enable room recordings.
Create a room in Twilio and join it:
Room _room;
final Completer _completer = Completer();

void _onConnected(Room room) {
    print('Connected to ${room.name}');
    _completer.complete(_room);
}

void _onConnectFailure(RoomConnectFailureEvent event) {
    print('Failed to connect to room ${event.room.name} with exception: ${event.exception}');
    _completer.completeError(event.exception);
}

Future connectToRoom() async {
    // Retrieve the camera source of your choosing
    var cameraSources = await CameraSource.getSources();
    var cameraCapturer = CameraCapturer(cameraSources.firstWhere((source) => source.isFrontFacing),);

    var connectOptions = ConnectOptions(
        accessToken,
        roomName: roomName,
        region: region, // Optional region.
        preferAudioCodecs: [OpusCodec()], // Optional list of preferred AudioCodecs.
        preferVideoCodecs: [H264Codec()], // Optional list of preferred VideoCodecs.
        audioTracks: [LocalAudioTrack(true)], // Optional list of audio tracks.
        dataTracks: [], // Optional list of data tracks
        videoTracks([LocalVideoTrack(true, cameraCapturer)]), // Optional list of video tracks.
    );
    _room = await TwilioProgrammableVideo.connect(connectOptions);
    _room.onConnected.listen(_onConnected);
    _room.onConnectFailure.listen(_onConnectFailure);
    return _completer.future;
}
Create a meeting in ConnectyCube and join it:
var startDate = DateTime.now().microsecondsSinceEpoch ~/ 1000; var endDate = startDate + 2 * 60 * 60; //create meeting for two hours var meetingToCreate = CubeMeeting( name: 'My meeting', startDate: startDate, endDate: endDate, attendees: [ CubeMeetingAttendee(userId: 123, email: '...'), CubeMeetingAttendee(userId: 123, email: '...')], // either ConnectyCube users ids or external emails can be provided ) ..record = false // true if you want to have a meeting call recorded ..withChat = false; // true if you're going to have a chat connected to the meeting var meeting = await createMeeting(meetingToCreate); var confRoomId = meeting.meetingId; var confSession = await ConferenceClient.instance.createCallSession( session.userId, // the id of current user callType: CallType.VIDEO_CALL, ); confSession.joinDialog(confRoomId, ((publishers) { // [publishers] is a list of users who currently publishes the media to the meeting }), conferenceRole: ConferenceRole.PUBLISHER); // or 'ConferenceRole.LISTENER' to join as a listener
8. Handle participants’ connections
This section covers how to manage participant connections, both when they join and leave a session, using Twilio and ConnectyCube. The code snippets below demonstrate how to handle these events, ensuring smooth interaction in your video conferencing application.
Twilio participant connected:
var room = await TwilioProgrammableVideo.connect(connectOptions); //connect to a room

room.onParticipantConnected((RoomParticipantConnectedEvent roomEvent) {
    roomEvent.remoteParticipant.onVideoTrackSubscribed((RemoteVideoTrackSubscriptionEvent event) {
        var mirror = false;
        _widgets.add(event.remoteParticipant.widget(mirror));
    });
});
ConnectyCube participant connected:
The ConnectyCube Flutter SDK has two separate callbacks for listening to the opponents’ media receiving events and the opponents’ joining events.
The opponent’s joining event looks as follows:
confSession.onPublishersReceived = _onPublishersReceived;

void _onPublishersReceived(List<int?> publishers) {
    // [publishers] the list of publishers who joined the call
}
The opponent’s media receiving event looks as follows:
confSession.onRemoteStreamTrackReceived = _addRemoteMediaStream;

void _addRemoteMediaStream(session, int userId, MediaStream stream, {String? trackId}) {
    var renderer = RTCVideoRenderer();
    await renderer.initialize();

    renderer.setSrcObject(stream: stream, trackId: trackId);

    var widget = RTCVideoView(
        renderer,
        objectFit: RTCVideoViewObjectFit.RTCVideoViewObjectFitContain,
        mirror: true,
    ); // the 'widget' can be used anywhere you need in the widgets tree
}
Twilio participant disconnected:
room.onParticipantDisconnected((RoomParticipantDisconnectedEvent event) {
    print('Participant ${event.remoteParticipant.identity} has left the room');
});
ConnectyCube participant disconnected:
confSession.onPublisherLeft = _onPublisherLeft;

void _onPublisherLeft(int? publisher) {
    print('Participant $publisher has left the room');
}
9. Mute/Unmute Local Media
This section provides instructions on how to mute and unmute local audio and video streams in both Twilio and ConnectyCube. Below, you’ll find the respective code snippets for toggling the audio and video settings for each platform.
Mute/Unmute Local Media in Twilio:
// audio
room.toggleAudioEnabled(false); // mute
room.toggleAudioEnabled(true); // unmute

// video
room.toggleVideoEnabled(false); // mute
room.toggleVideoEnabled(true); // unmute
Mute/Unmute Local Media in ConnectyCube:
// audio
confSession.setMicrophoneMute(true); // mute
confSession.setMicrophoneMute(false); // unmute

// video
confSession.setVideoEnabled(false); // mute
confSession.setVideoEnabled(true); // unmute
10. Leave and End Sessions
To leave the current joined video room:
Twilio:
room.disconnect();
ConnectyCube:
confSession.leave();
Gain more with ConnectyCube
ConnectyCube offers a variety of features that significantly enhance the functionality of your application. Here are some of the key features we offer:
- Whiteboard – For collaborative drawing sessions, the whiteboard feature is ideal. It allows multiple users to draw and annotate in real-time during a video call or a separate session. Learn more about the whiteboard.
- Recording – Record your video conferences and calls to review them later or for record-keeping purposes. This feature is especially useful for business meetings and educational sessions. Learn more about recording.
- Scheduling Meetings – Plan and schedule meetings with ease. ConnectyCube provides tools to schedule video calls and send invitations to participants. Learn more about scheduling meetings.
- Notifications (Push) – Configure push notifications to keep users informed about new messages, calls, or any other events. This helps in keeping the users engaged and updated. Learn more about push notifications.
- Screen Sharing – Share your screen during a video call to enhance collaboration and presentations. This feature is particularly useful for online meetings, tutorials, and technical support. Learn more about screen sharing.
- Chat in Conference – Integrate chat functionality within your video conferences to enable real-time text communication alongside video. This feature enhances interaction and provides a comprehensive communication solution. Learn more about chat in conference.
- Switch Audio/Video Input During Conference – Easily switch between different audio and video input devices during a conference. This feature provides flexibility and ensures that you can adapt to different environments and technical requirements. Learn more about switching audio input and switching video cameras.
- Platform Availability – ConnectyCube’s SDK is available on multiple platforms including:
- Flutter
- React Native
- Web
- Native Script
- Cordova
- iOS
- Android
Start your migration today to ensure uninterrupted video communication services. ConnectyCube provides detailed documentation, an array of powerful features, and excellent support to help you through the process. Don’t wait—migrate your project to ConnectyCube and continue delivering high-quality video conferencing experiences to your users.
Check out more with our powerful Flutter Video Conferencing SDK documentation to ensure a smooth and easy migration. Follow this link to find the real example of how the ConnectyCube conference call work.
Get started now by visiting ConnectyCube and exploring their migration guides and resources. Embrace the future of video communication with ConnectyCube!