VoIP push notifications are the backbone of any real-time calling feature. They make sure users get incoming call alerts instantly – even when your iOS app is closed or running in the background.
But getting them to work smoothly can sometimes feel like solving a puzzle. Everything seems fine in the simulator – until real users start reporting missed calls or silent notifications. In most cases, it comes down to something small: a mismatched certificate, an invalid token, or an incorrect payload.
In this post, we’ll walk through how VoIP pushes work on iOS, the most common issues developers run into, and how to fix them quickly.
-
Quick refresher: how VoIP Push Notifications work on iOS
Before we jump into troubleshooting, let’s quickly go over how VoIP push notifications actually work behind the scenes.
- Your app first registers for PushKit notifications to get a unique VoIP token.
- When someone calls, your server sends a VoIP push through Apple Push Notification service (APNs) using that token.
- iOS receives the push and wakes up your app in the background – even if it’s not running.
- Your app then reports the incoming call via CallKit, which shows the native iOS call screen.
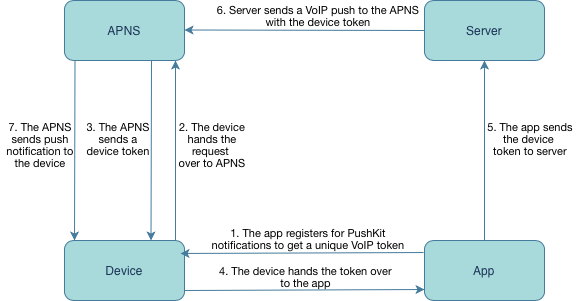
Each of these steps depends on the others. If any link in the chain fails – a bad token, a wrong payload, or a missing CallKit trigger – your users might never receive the call alert.
-
Common issues and how to fix them
Issue 1: VoIP Notifications not received at all
If your app isn’t receiving VoIP pushes, don’t panic – this is one of the most common issues developers face when setting up VoIP on iOS.
🔍 Possible causes:
- The VoIP push certificate is invalid or expired.
- The app is using the wrong device token (remember, the VoIP token from PushKit is not the same as a regular APNs token).
- Pushes are sent to the wrong environment – for example, sandbox instead of production.
🛠️ How to fix it:
- Check your VoIP Services certificate in the Apple Developer Console and make sure it’s valid.
- Confirm you’re sending pushes using the PushKit device token.
- Make sure the push environment matches your build type:
Sandbox → for development builds
Production → for TestFlight or App Store builds
Even a small mismatch between certificates, tokens, or environments can prevent iOS from delivering VoIP pushes to your app.
Issue 2: Notifications are delayed or missed
Sometimes VoIP pushes do arrive, but with noticeable delays or not at all after some time. This usually means iOS is managing your app’s background activity too aggressively or the pushes aren’t prioritized correctly.
🔍 Possible causes:
- The system kills your app too frequently to save resources.
- Background Modes → Voice over IP isn’t enabled properly in Xcode.
- Pushes are being sent with low priority, or Apple is temporarily delaying delivery under heavy load.
🛠️ How to fix it:
- In Xcode, enable Background Modes → Voice over IP so iOS knows your app can handle incoming calls.
- Keep your VoIP push payloads minimal – large payloads or extra data can slow delivery.
- Use high-priority notifications (`apns-priority: 10`) when sending via APNs to ensure instant delivery.
💡 Tip: VoIP pushes are designed to wake your app only when a real call is incoming. Sending too many “test” or “keep-alive” pushes can cause Apple to throttle or deprioritize them.
Issue 3: Incoming calls not displayed when the app is killed
Your VoIP push arrives, but no incoming call screen appears – the user never knows they’re being called. This problem often comes down to how the app handles the notification once it’s received.
🔍 Possible causes:
- CallKit isn’t triggered when the VoIP push arrives.
- The app isn’t being properly re-launched by PushKit when it’s terminated.
- The payload lacks key call information (e.g., caller ID or session type).
🛠️ How to fix it:
- Make sure to call
'reportNewIncomingCall'inside your VoIP push handler – this step is required to show the native iOS call UI. - Test with the device locked and the app terminated – VoIP pushes should still bring up the call screen.
- Verify that your VoIP push payload contains all mandatory fields (like caller ID, call type, or session ID) so CallKit can correctly display the call.
💡 Tip: If the push arrives but no CallKit UI appears, add logging in your VoIP handler to confirm that the push is received and processed as expected.
Issue 4: Missing permissions or user settings
Sometimes the issue isn’t technical at all – it’s just about permissions. Even if everything in your push setup is correct, users won’t receive call alerts if they’ve denied access to notifications or the microphone.
🔍 Possible causes:
- The user denied Push Notification or Microphone permissions.
- The app didn’t properly request these permissions on first launch.
🛠️ How to fix it:
- Prompt users to enable Push Notifications and Microphone Access when they first open the app.
- If permissions were previously denied, guide users to Settings → Notifications → [Your App] to re-enable them.
💡 Tip: Always request permissions at a moment that makes sense – for example, right before the first call. This makes users more likely to grant access.
Issue 5: VoIP Notifications stop working after an app update
Everything was working perfectly – until you released a new version of your app, and suddenly VoIP notifications stopped coming through. Don’t worry – this is a common issue after code signing or version updates.
🔍 Possible causes:
- The VoIP push certificate was invalidated or replaced during re-signing.
- The app didn’t handle token invalidation, so the device token used by your server is no longer valid.
🛠️ How to fix it:
- After every major app update or re-signing, refresh and upload a new VoIP push certificate to your server.
- Implement proper handling of
'pushRegistry(_:didInvalidatePushTokenFor:)'to automatically re-register a new VoIP token when the old one becomes invalid.
💡 Tip: Automating the re-registration process after updates ensures users continue receiving calls seamlessly, without needing to reinstall the app.
-
Debugging tips
When VoIP notifications don’t behave as expected, debugging can feel a bit tricky – especially since they don’t work in the iOS simulator. Here are a few reliable ways to track down the problem and verify that your setup is working correctly:
- Use Apple’s Console app or go to Xcode → Devices and Simulators → Logs to watch incoming VoIP push events in real time.
- Always include the header `apns-push-type: voip` when sending notifications. Missing this header can cause Apple to silently drop the push.
- Test exclusively on real devices – VoIP pushes won’t be delivered in the simulator.
- If you need deeper insight, use a third-party VoIP testing tool or a logging middleware to inspect payloads, delivery times, and responses from APNs.
💡 Tip: Add server-side logging for every push you send – it helps you confirm whether APNs accepted the request and can save hours of debugging time later.
-
Best practices for reliable VoIP push delivery
Once your VoIP setup is working smoothly, it’s important to keep it that way. Follow these best practices to ensure your call notifications stay fast, consistent, and reliable over time.
✅ Recommended practices:
- Use CallKit for call handling. It’s required for background VoIP apps and provides the familiar, native iOS call screen that users trust.
- Keep your VoIP payload lightweight. Smaller payloads mean faster delivery and fewer delays when waking the app.
- Avoid sending too many VoIP pushes in a short time. Apple may throttle your pushes if the system detects unnecessary or excessive traffic.
- Renew VoIP certificates regularly. Don’t wait for them to expire – schedule periodic checks and renewals in advance.
- Monitor delivery and performance metrics. Track push logs and delivery statuses from your backend – for example, using ConnectyCube’s dashboard and API tools – to quickly identify and resolve issues.
💡 Tip: Consistency matters more than frequency. Send VoIP pushes only when needed, and keep your infrastructure clean and efficient.
-
Conclusion
At ConnectyCube, we know how important reliable call delivery is for any communication app. VoIP push notifications keep your users connected, ensuring that incoming calls ring instantly – whether the app is active, in the background, or even terminated.
Thay play a vital role in delivering seamless real-time communication, but require precise setup and continuous maintenance.
By keeping your certificates, tokens, permissions, and background configurations in check and following the best practices above, you can eliminate most delivery issues and guarantee a smooth user experience.
If you’re building VoIP features with ConnectyCube, our SDKs and APIs handle all the heavy lifting – from VoIP push registration to reliable call delivery – so you can focus on building intuitive, engaging communication experiences.
👉 Need help integrating or debugging VoIP calls?
Explore our documentation or contact our support team.
Join our Discord community for real-time support, tips, and to connect with other developers!